Introduction
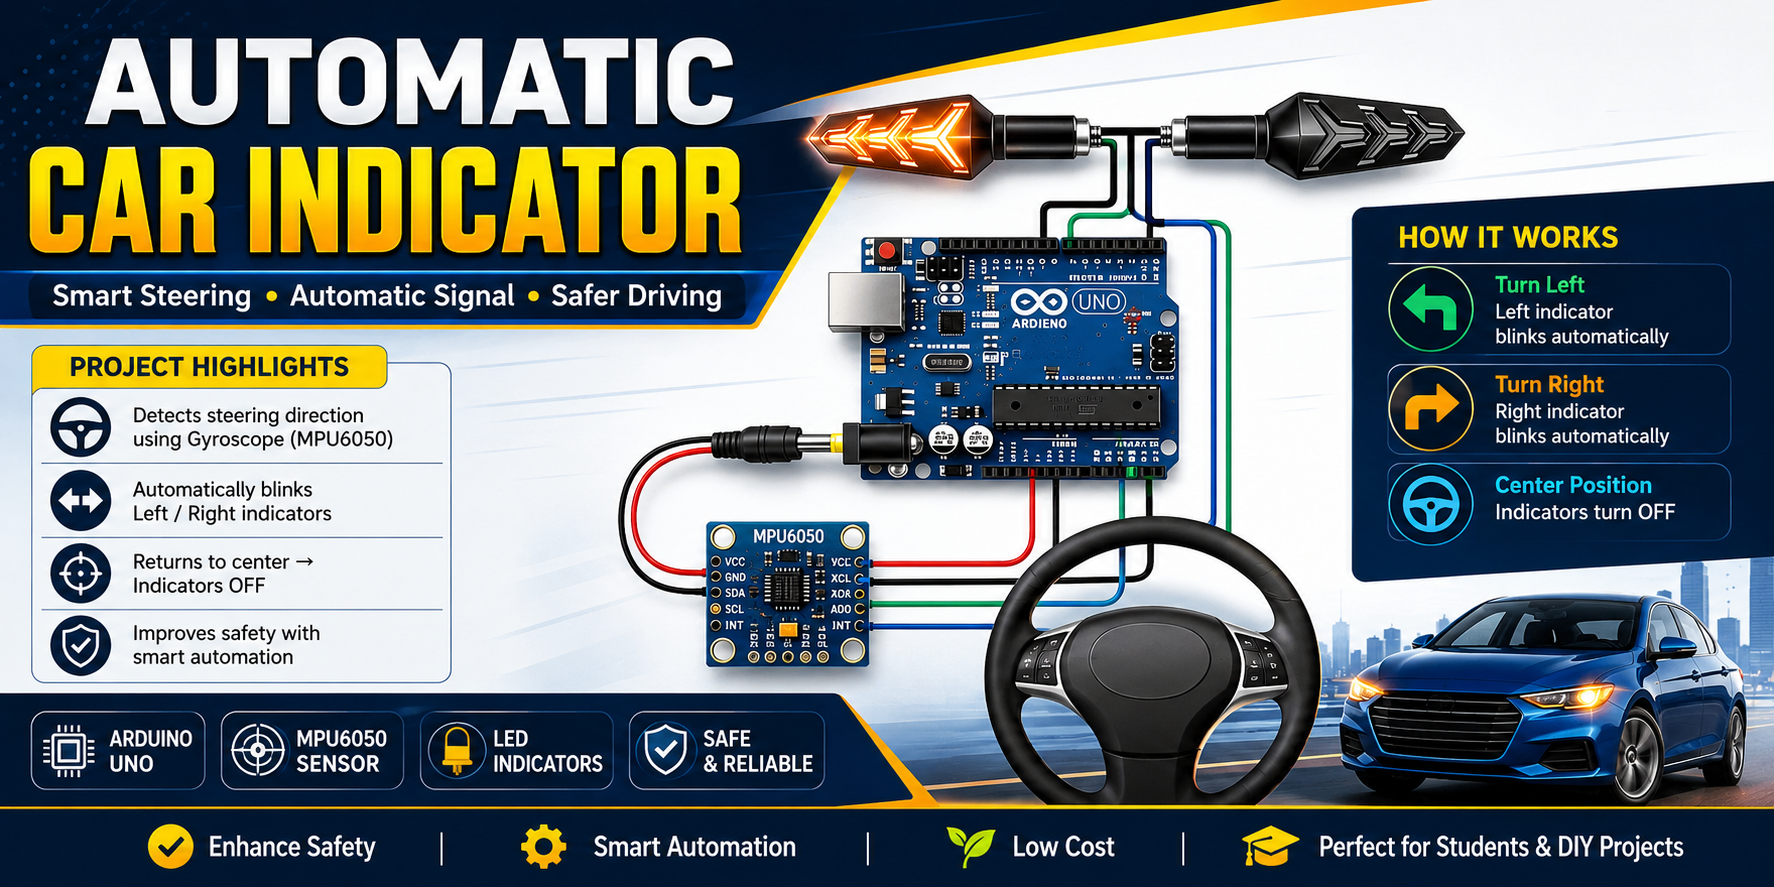
The Automatic Car Indicator System is a smart project using an Arduino UNO and a gyroscope/accelerometer sensor module (MPU6050 or similar) to automatically activate left or right turn indicators based on steering wheel movement. This system can improve driving safety by helping drivers signal turns automatically.
The project detects steering direction using the motion sensor attached to the steering wheel and controls LED indicators connected to the Arduino.
Components Required
- Arduino UNO
- MPU6050 Gyroscope/Accelerometer Sensor
- 2 LED Indicators (Left & Right)
- 220Ω Resistors
- Jumper Wires
- Breadboard
- USB Cable / 12V Power Supply
Working Principle
- The MPU6050 sensor detects steering wheel rotation.
- Arduino reads the sensor angle values.
- If the steering turns left beyond a threshold:
- Left indicator blinks automatically.
- If the steering turns right:
- Right indicator blinks automatically.
- When steering returns to center:
- Indicators turn OFF.
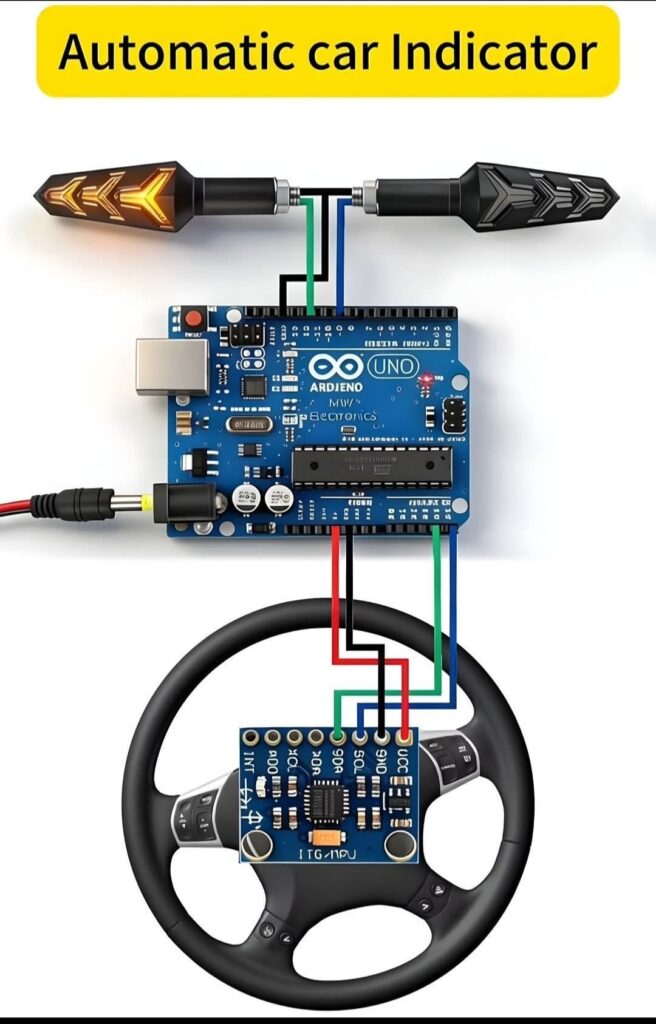
Wiring Connections
MPU6050 to Arduino UNO
| MPU6050 | Arduino UNO |
|---|---|
| VCC | 5V |
| GND | GND |
| SDA | A4 |
| SCL | A5 |
LEDs
| LED | Arduino Pin |
|---|---|
| Left Indicator | D8 |
| Right Indicator | D9 |
Arduino Code
#include <Wire.h>
#include <MPU6050.h>

MPU6050 mpu;

const int leftLED = 8;
const int rightLED = 9;

int16_t ax, ay, az;
int16_t gx, gy, gz;

void setup() {
  Serial.begin(9600);
  Wire.begin();

  mpu.initialize();

  pinMode(leftLED, OUTPUT);
  pinMode(rightLED, OUTPUT);

  if (mpu.testConnection()) {
    Serial.println("MPU6050 Connected Successfully");
  } else {
    Serial.println("MPU6050 Connection Failed");
  }
}

void loop() {

  mpu.getMotion6(&ax, &ay, &az, &gx, &gy, &gz);

  Serial.print("Gyro Z: ");
  Serial.println(gz);

  // LEFT TURN
  if (gz > 15000) {
    blinkLeft();
  }

  // RIGHT TURN
  else if (gz < -15000) {
    blinkRight();
  }

  // CENTER
  else {
    digitalWrite(leftLED, LOW);
    digitalWrite(rightLED, LOW);
  }

  delay(100);
}

void blinkLeft() {
  digitalWrite(rightLED, LOW);

  digitalWrite(leftLED, HIGH);
  delay(300);
  digitalWrite(leftLED, LOW);
  delay(300);
}

void blinkRight() {
  digitalWrite(leftLED, LOW);

  digitalWrite(rightLED, HIGH);
  delay(300);
  digitalWrite(rightLED, LOW);
  delay(300);
}
Installing MPU6050 Library
Steps
- Open Arduino IDE
- Go to:
Sketch → Include Library → Manage Libraries - Search:
MPU6050 - Install:
- MPU6050 by Electronic Cats or Jeff Rowberg
How It Works
The gyroscope measures steering rotation speed.
- Positive Z-axis value → Left Turn
- Negative Z-axis value → Right Turn
- Small movement → No Indicator
You can adjust sensitivity by changing:
15000
Higher value = less sensitive
Lower value = more sensitive
Advantages
- Automatic signaling
- Improved road safety
- Smart vehicle automation project
- Easy to build
- Low cost
Future Improvements
- Add relay module for real car indicators
- Wireless steering sensor
- OLED display
- Bluetooth monitoring
- ESP32 IoT integration
- Emergency hazard lights
Conclusion
This Arduino-based Automatic Car Indicator System is an excellent beginner-to-intermediate electronics project. It combines motion sensing and automation to create a smart vehicle safety feature using simple and affordable components.
Perfect for:
- Arduino learners
- Automotive electronics projects
- Engineering students
- DIY smart car systems