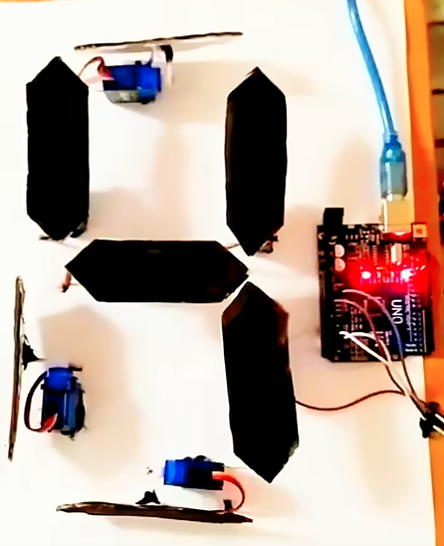
Arduino project that uses a servo motor and a 7-segment display to count from 0 to 9.
Here’s a complete breakdown so you can both understand it and build it.
1. Project Overview
In this project:
- The Arduino will count from 0 to 9.
- The 7-segment display will show the number.
- The servo motor will move to a specific position for each number.
For example:
- When the display shows
0, the servo is at 0°. - When the display shows
5, the servo is at 90°. - When the display shows
9, the servo is at 180°.
2. Components Needed
- Arduino Uno (or compatible)
- SG90 or MG90S Servo motor
- Common cathode or common anode 7-segment display
- 220Ω resistors (x7)
- Breadboard + jumper wires
- USB cable for Arduino
3. Circuit Wiring
7-Segment Display (Common Cathode example)
Let’s assign Arduino pins for each segment:
| Segment | Arduino Pin |
|---|---|
| A | 2 |
| B | 3 |
| C | 4 |
| D | 5 |
| E | 6 |
| F | 7 |
| G | 8 |
Common cathode pin → GND.
Servo Motor
- Signal pin → Arduino pin 9
- Vcc → 5V
- GND → GND
4. Arduino Code
cppCopyEdit#include <Servo.h>

Servo myServo;

// Segment pin order: A, B, C, D, E, F, G
int segmentPins[] = {2, 3, 4, 5, 6, 7, 8};

// Number patterns for 0–9 (common cathode)
byte numbers[10][7] = {
  {1, 1, 1, 1, 1, 1, 0}, // 0
  {0, 1, 1, 0, 0, 0, 0}, // 1
  {1, 1, 0, 1, 1, 0, 1}, // 2
  {1, 1, 1, 1, 0, 0, 1}, // 3
  {0, 1, 1, 0, 0, 1, 1}, // 4
  {1, 0, 1, 1, 0, 1, 1}, // 5
  {1, 0, 1, 1, 1, 1, 1}, // 6
  {1, 1, 1, 0, 0, 0, 0}, // 7
  {1, 1, 1, 1, 1, 1, 1}, // 8
  {1, 1, 1, 1, 0, 1, 1}  // 9
};

void setup() {
  // Set all segment pins as output
  for (int i = 0; i < 7; i++) {
    pinMode(segmentPins[i], OUTPUT);
  }

  myServo.attach(9); // Servo signal pin
}

void loop() {
  for (int num = 0; num <= 9; num++) {
    displayNumber(num);

    // Map number 0–9 to servo angle 0–180
    int angle = map(num, 0, 9, 0, 180);
    myServo.write(angle);

    delay(1000); // Wait 1 second before next number
  }
}

void displayNumber(int num) {
  for (int seg = 0; seg < 7; seg++) {
    digitalWrite(segmentPins[seg], numbers[num][seg]);
  }
}
5. How It Works
- The
numbersarray defines which segments light up for each digit. - In the
loop(), the Arduino counts from0to9. - For each number:
displayNumber(num)lights up the correct segments.- The servo moves to a mapped position based on the number.
- After a short delay, it moves to the next number.